Many parents tend to freak out whenever
“computing” or “programming” subject is brought up, and too often, it’s their
own fear that limit themselves or their children the broader uptake in
technologies.
Technology has evolved since the dawn of
smartphones. Gone are the days where it takes a person conversant in
electronics to build an alarm clock. With
today’s advancement, a micro-controller and a display, with a little
programming skill is all it takes to achieve that task. With Scratch, as a
block based programming tool, there’s nothing easier than snapping the blocks
together.
By the way,
Scratch comes in 2 version. The latest version being Scratch 2.0, and the older
version is Scratch 1.4. As mentioned earlier, other than interactive
programming with Scratch, Arduino micro controller will be included to get
things “physical”. The only stable derivative that I’ve tried so far is S4A, a
Scratch 1.4 extension. Hence, throughout my blog, I’ll stick to Scratch 1.4 and
S4A.
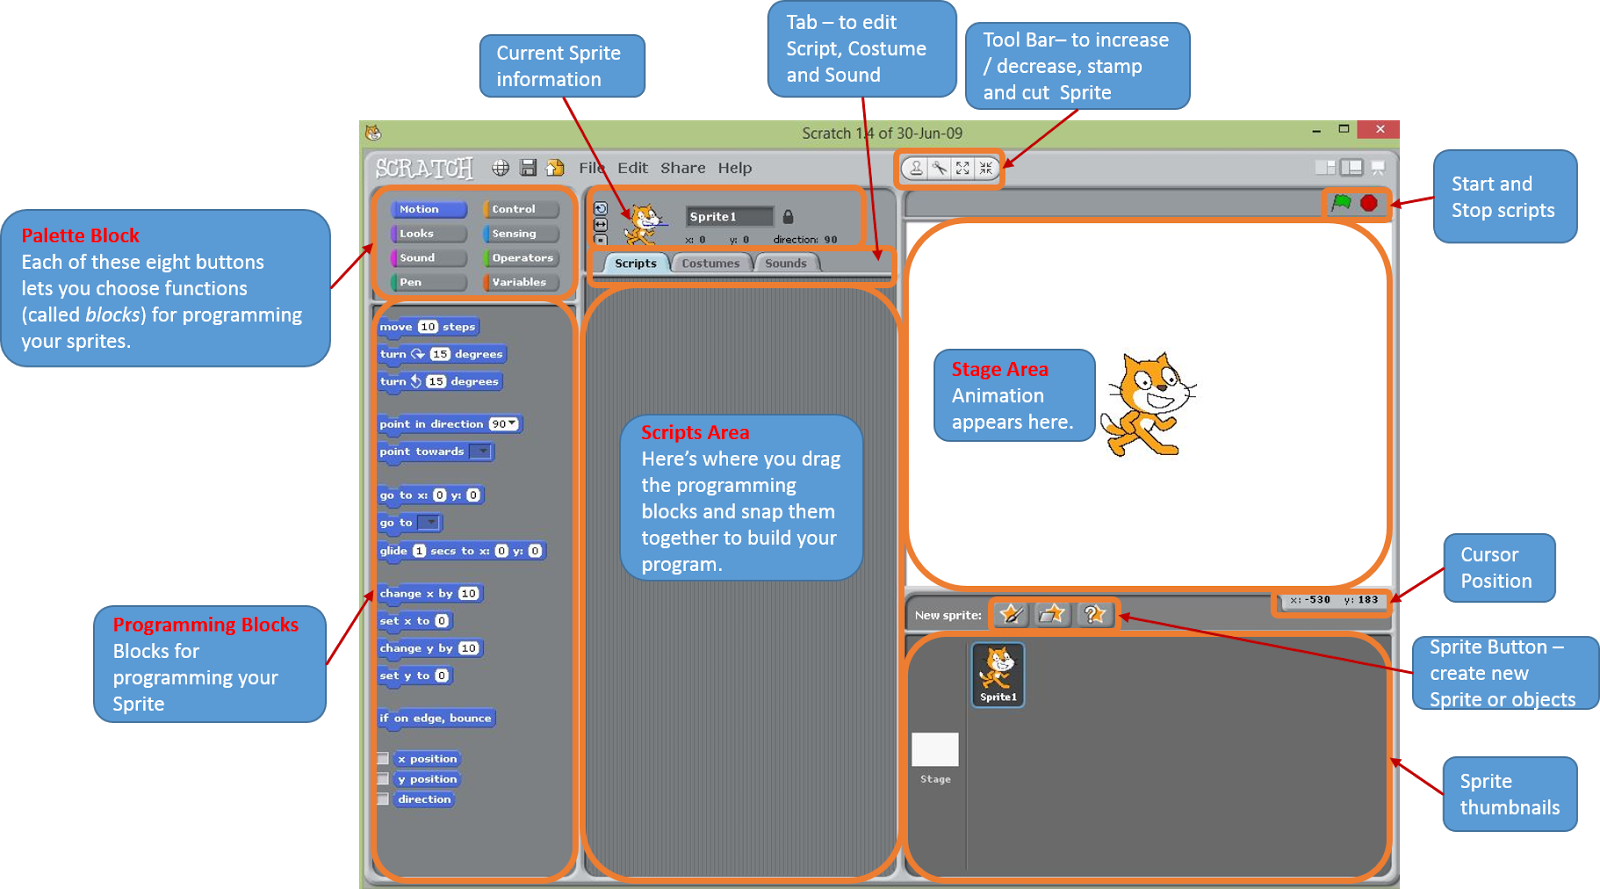
Start Scratch 1.4 once you have completed the installation. The
interface should look something like below :
Make
something move
On the Stage area, a default image of a cat is loaded whenever Scratch is
started. You can import or create as many images as you like, and each image is
assigned a name Sprite1, Sprite2 etc. All the sprites are visible on the Sprite
Thumbnail area.
Drag the “move
(10) steps” block
to the Script Area as shown below :

As the name implies, it moves a sprite 10 steps
whenever it is activated. The number of “steps” represent each pixel on the
computer screen. Try exploring the “move” block by clicking it with your mouse
pointer and change the steps with different number. The sprite should move
accordingly to the steps when the “move” block is clicked.
You can drag the sprite to anywhere on the Stage
Area, which is 360 x 480 pixels wide, as shown below.

The sprite position is shown right above the
Script Area, next to the sprite image :
Try to drag the sprite anywhere the Script Area,
the sprite position changes accordingly.

Let’s create a building block, making the sprite
move back and forth around the Stage Area. The program has to meet the
following criteria :
- Program starts upon clicking the "when clicked" block or the "Green Flag" button.

- The sprite starts moving at position x = 0, y = 0 at the beginning of the program.
- When the sprite hits the edge of the screen, turns back and move to the other end of the screen.
Let’s follow the above criteria “sequentially”.
Criteria(1) - Click on the “Control” button from the Pallete Block. Drag the
block as shown below

Criteria (2) –The sprite starts at position x= 0, y = 0 the minute "when clicked" block
is clicked
irrespective of where the sprite is. , then move 10 steps continuously.
Click on the “Motion” button and drag "go to x:() y:()" block to the Script
Area

Snap the "when clicked" and "go to x:() y:()"
blocks together. It should
look something like below

Drag the "move() steps"
Criteria (3) – The sprite turns back when it hits
the edge of the screen.
We have to look for a block that does the job. On the “Motion” button, scroll down the list
of blocks and try to locate "if on edge, bounce"
By now, your script should resemble below

Are we ready to go ???
Let’s analyse the script before we begin. It is
worth noting that the script executes each block (instruction) “sequentially”
once at a time and it looks something like below in “flow chart” terminology.

When the "if on edge, bounce"
block is executed, it just
stops there as there are no other instructions to follow, and we want the
sprite to move continuously. To get around it, the solution is to create a loop
so that it “repeats” the operation after the "if on edge, bounce" block.

To create a loop based on the above flow chart,
drag the "forever"

That looks more sensible. Now, click on the "when clicked" or the "green" flag on the top right to start the program.
You will note the following :
- The sprite moves very fast.
- When the sprite hits the right edge, it “bounced” back moving to the left direction upside down
While the sprite is still moving, slow down the
speed by inserting the "wait () secs"
block as shown below

The sprite now moves 10 steps every 1 sec and
this is too slow. Change the delay from 1 sec to 0.2 sec, or any value at your
comfort.
Next, click on the “left-right” button as shown below

That should fix the “upside down” position of the
sprite.
Somehow, something is still missing. The sprite
doesn’t look vibrant, and we need to add a little “spice” to the script with some animation
Under the “Looks” button, click on the “Costumes”
tab

You will see two costumes, namely Costume1 and
Costume2.
Note : Each sprite can have multiple costumes,
either created by yourself or imported from the built-in library. You can have
as many sprites as you like.
Imagine if the costume of the sprite switches
each time it moves, doesn’t it give a bit of zing to the sprite ??
Return to the Script Area by clicking on the “Scripts”
tab a show below.

Click on the “Looks” button, and insert the "next costume"

Your script now should look like below

By now, the sprite should look more vibrant, “walking”
back and forth the Stage Area.
No comments:
Post a Comment