Not that I enjoyed revealing my private life, but to share Scratch can do a lot more things than we can imagine. The features of "change effect() by ()" seemed to be known not by many people, and the above animation unveils one of its numerous attributes. The script is shown below.
Wednesday, 15 January 2014
A simple Heartbeat animation
I remember my wife once asked how I felt the first time I met her, well...that was 26 years ago. For some unknown reasons, that same question inexplicably "haunted" me recently and I decided to deliver the same message again, in a different way with Scratch http://youtu.be/Ld-QV1vn9s4
Not that I enjoyed revealing my private life, but to share Scratch can do a lot more things than we can imagine. The features of "change effect() by ()" seemed to be known not by many people, and the above animation unveils one of its numerous attributes. The script is shown below.
Tuesday, 14 January 2014
More animation
Here's a good step-by-step video tutorial from http://inventwithscratch.com/ how animation is created.
http://www.youtube.com/watch?v=kZbenCm0AG8&list=PL0-84-yl1fUkall6a14nqzXpG79-RgI1F&index=6
Happy Scratching
http://www.youtube.com/watch?v=kZbenCm0AG8&list=PL0-84-yl1fUkall6a14nqzXpG79-RgI1F&index=6
Happy Scratching
Sunday, 29 December 2013
Learning simple maths with shapes
If you were to ask a kid to draw a square and they would effortlessly
get it done. Have you ever wonder if they really understand the definition of a
square ?? Or a triangle ?? Getting
things done is one thing, being able to describe or communicate effectively to
another is a different story all together.
There is no doubt programming requires the use of logic, mathematical
literacy and a little common sense, yet communication skill plays an important
part to deliver clear and precise instructions in order for the computer to
carry out the intended task.
How does math comes into picture with shapes ??
We all know that a closed shape has 360 deg, if we divide 360 by the number
of sides of a shape, for example a square which has 4 sides, that will give you
90 deg on each side.
So, definition of a square is "a shape having 4 equal sides with 90 deg
at each corner of the 4 sides".
Try working out a pentagon, triangle or a hexagon with your kids.
Let’s start Scratch to draw a square. Get yourself familiar with the
following blocks where we will be using it for our assignment.
You might like to shrink the sprite to see clearer how the lines are
drawn. Drawing lines in computer sense means moving an object leaving a trail,
and that’s where the “pen” blocks come into play.
Let’s work out a sequence for the script based on a flow chart before
we snap the blocks together.
This is how the flow chart interprets :
- Clear all the lines whenever the program starts
- Draw the square beginning at position x = 0, y = 0
- “Get” the pen
- Move 100 steps
- Turn 90 deg to the right
- Repeat step (4) and step (5) 3 more times
- “Keep” the pen when finished drawing
Take note of the loop. As a square has 4 sides, we only need to repeat
the sides 4 times, unlike the “forever” loop covered in my previous post.
We can now snap the blocks as shown below and that completes our task.
Now, what if we want to draw a hexagon ???
Hmm……a hexagon has 6 sides and what’s the angle at each side ???
Divide 360 by 6 and that gives 60 deg.
Using the same script we had created, replace 4 with 6 in the “repeat”
block and 120 deg in the “turn () degrees” block. You should have something like below.
Try other shapes yourself like triangle, pentagon, etc. A closed shape
is only valid if the number of repeats multiply by the angles should give you
360.
Saturday, 28 December 2013
Scratch Tutorial
Here are some sites that will aid the beginners :
I'll be more than happy to help if needed :-)
Thursday, 26 December 2013
Learn to juggle, not a Juggler's way
My previous post explained
how Scratch programming blocks were snapped together to make a simple
animation. For convenience sake, the script is reproduced below :
Always
remember that the blocks are executed one at a time in succession. In
conclusion, placement of the blocks over another is crucial. The “go to x: ()
y: ()” block is first carried out when the “Green Flag” button is clicked, followed
by “move () steps”, and so on.
At some
point, the rule does not hold depending on your application. Try re-position or
juggle any of the blocks within the “forever” block in the above script. The
animation may look the same to our naked eyes, but it makes a lot of difference
as far as the script is concern.
Continuing
with the above script, let’s add some graphics to embellish the backdrop. Click
on the “Stage” and then the “Background” tab.
Click on the “Edit” button and the Paint Editor appears.
Import the graphics from the built-in library.
You can select any of the images from the various folders.
Select “woods” under the Nature folder for the purpose of this practice. Shrink
the sprite by clicking on the “Shrink” button and your stage should look like
below.
Note : Don't forget to click on the sprite when the “Shrink” button is
pressed. Clicking only the
"Shrink" button does not minimize the size of the sprite.
That’s not the end. You can add sound, another sprite ,etc
to make it more lively. Your imagination is the limit.
Let’s add a sound “meow” to the cat whenever it hits the
edge. Click on the “Sound” button on your left. If you do not see the “play
sound (meow)” block on your screen but “play sound (pop)” instead, that
means you are still in the “Stage” Script Area. Click sprite1 (the cat) and it
should appear above the Script Area as shown below
Drag the “play sound (meow)” block and insert it below the “if
on edge, bounce” block. The script should look like below :
Start the animation by clicking the “Green Flag” button. Oops !!! We got a bug.
Click the “Stop” button on the far right above the stage
area.
The cat keeps "meowing" non-stop and we wanted it to "meow" ONLY when it hits the edge.
This is where the "decision making" blocks come into play. Creating a flow chart helps make the picture clearer.
We will add two blocks shown below, an “ if ” block for decision making, a “touching (edge)” to
sense the edge
Snap the "touching (edge)” block into the blank space of the “ if ” block. The final script should resemble below
Trying exploring with with your own imagination with more blocks and sprites.
Happy Scratching
Sunday, 22 December 2013
Getting Started
Many parents tend to freak out whenever
“computing” or “programming” subject is brought up, and too often, it’s their
own fear that limit themselves or their children the broader uptake in
technologies.
Technology has evolved since the dawn of
smartphones. Gone are the days where it takes a person conversant in
electronics to build an alarm clock. With
today’s advancement, a micro-controller and a display, with a little
programming skill is all it takes to achieve that task. With Scratch, as a
block based programming tool, there’s nothing easier than snapping the blocks
together.
By the way,
Scratch comes in 2 version. The latest version being Scratch 2.0, and the older
version is Scratch 1.4. As mentioned earlier, other than interactive
programming with Scratch, Arduino micro controller will be included to get
things “physical”. The only stable derivative that I’ve tried so far is S4A, a
Scratch 1.4 extension. Hence, throughout my blog, I’ll stick to Scratch 1.4 and
S4A.
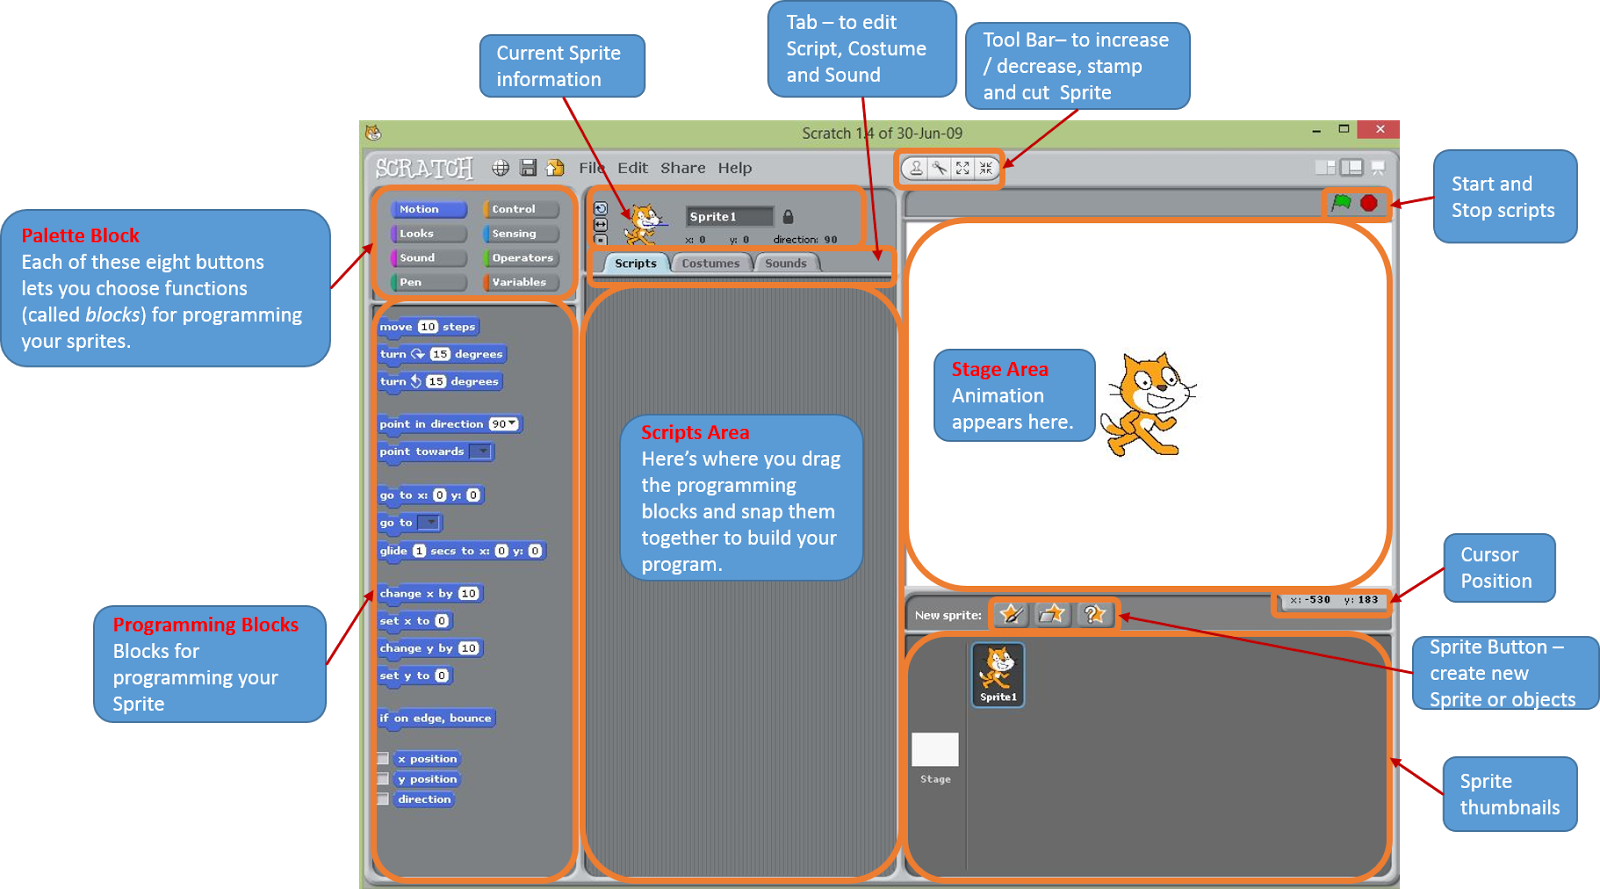
Start Scratch 1.4 once you have completed the installation. The
interface should look something like below :
Make
something move
On the Stage area, a default image of a cat is loaded whenever Scratch is
started. You can import or create as many images as you like, and each image is
assigned a name Sprite1, Sprite2 etc. All the sprites are visible on the Sprite
Thumbnail area.
Drag the “move
(10) steps” block
to the Script Area as shown below :
As the name implies, it moves a sprite 10 steps
whenever it is activated. The number of “steps” represent each pixel on the
computer screen. Try exploring the “move” block by clicking it with your mouse
pointer and change the steps with different number. The sprite should move
accordingly to the steps when the “move” block is clicked.
You can drag the sprite to anywhere on the Stage
Area, which is 360 x 480 pixels wide, as shown below.
The sprite position is shown right above the
Script Area, next to the sprite image :
Try to drag the sprite anywhere the Script Area,
the sprite position changes accordingly.
Let’s create a building block, making the sprite
move back and forth around the Stage Area. The program has to meet the
following criteria :
- Program starts upon clicking the "when clicked" block or the "Green Flag" button.
- The sprite starts moving at position x = 0, y = 0 at the beginning of the program.
- When the sprite hits the edge of the screen, turns back and move to the other end of the screen.
Let’s follow the above criteria “sequentially”.
Criteria(1) - Click on the “Control” button from the Pallete Block. Drag the
block as shown below
Criteria (2) –The sprite starts at position x= 0, y = 0 the minute "when clicked" block
is clicked
irrespective of where the sprite is. , then move 10 steps continuously.
Click on the “Motion” button and drag "go to x:() y:()" block to the Script
Area
Snap the "when clicked" and "go to x:() y:()"
blocks together. It should
look something like below
Drag the "move() steps" block and snap it below "go to x:() y:()" block.
Criteria (3) – The sprite turns back when it hits
the edge of the screen.
We have to look for a block that does the job. On the “Motion” button, scroll down the list
of blocks and try to locate "if on edge, bounce" block. Snap it to below the "move() steps" block.
By now, your script should resemble below
Are we ready to go ???
Let’s analyse the script before we begin. It is
worth noting that the script executes each block (instruction) “sequentially”
once at a time and it looks something like below in “flow chart” terminology.
When the "if on edge, bounce"
block is executed, it just
stops there as there are no other instructions to follow, and we want the
sprite to move continuously. To get around it, the solution is to create a loop
so that it “repeats” the operation after the "if on edge, bounce" block.
To create a loop based on the above flow chart,
drag the "forever" block to the Script Area and
insert the "if on edge, bounce" and "move() steps" into the “forever” block.
Your script should look something like below
That looks more sensible. Now, click on the "when clicked" or the "green" flag on the top right to start the program.
You will note the following :
- The sprite moves very fast.
- When the sprite hits the right edge, it “bounced” back moving to the left direction upside down
While the sprite is still moving, slow down the
speed by inserting the "wait () secs"
block as shown below
The sprite now moves 10 steps every 1 sec and
this is too slow. Change the delay from 1 sec to 0.2 sec, or any value at your
comfort.
Next, click on the “left-right” button as shown below
That should fix the “upside down” position of the
sprite.
Somehow, something is still missing. The sprite
doesn’t look vibrant, and we need to add a little “spice” to the script with some animation
Under the “Looks” button, click on the “Costumes”
tab
You will see two costumes, namely Costume1 and
Costume2.
Note : Each sprite can have multiple costumes,
either created by yourself or imported from the built-in library. You can have
as many sprites as you like.
Imagine if the costume of the sprite switches
each time it moves, doesn’t it give a bit of zing to the sprite ??
Return to the Script Area by clicking on the “Scripts”
tab a show below.
Click on the “Looks” button, and insert the "next costume" right below the "move() steps" block.
Your script now should look like below
By now, the sprite should look more vibrant, “walking”
back and forth the Stage Area.
Monday, 16 December 2013
Physical Computing with Scratch and Arduino
In my previous post, I briefly touched on the 21st Century
Learning paradigm and Scratch, a visual block based programming tool developed by a
collaboration between elementary educators and MIT computer science scholars (oh…..did
I say Scratch is free ??).
Since its inception in 2007, their web site has
become a vibrant online community with (reportedly) more than a million Scratchers
worldwide sharing and remixing their projects. Check out their site at http://scratched.media.mit.edu/, there
are tons of information to learn and share.
A number of derivatives has emerged with added features that was not
available in Scratch. The most popular being SNAP, developed by Jens Mönig of University
of California, Berkeley. It’s a web-based application though, might not
be favourable or suitable to those with connectivity issues
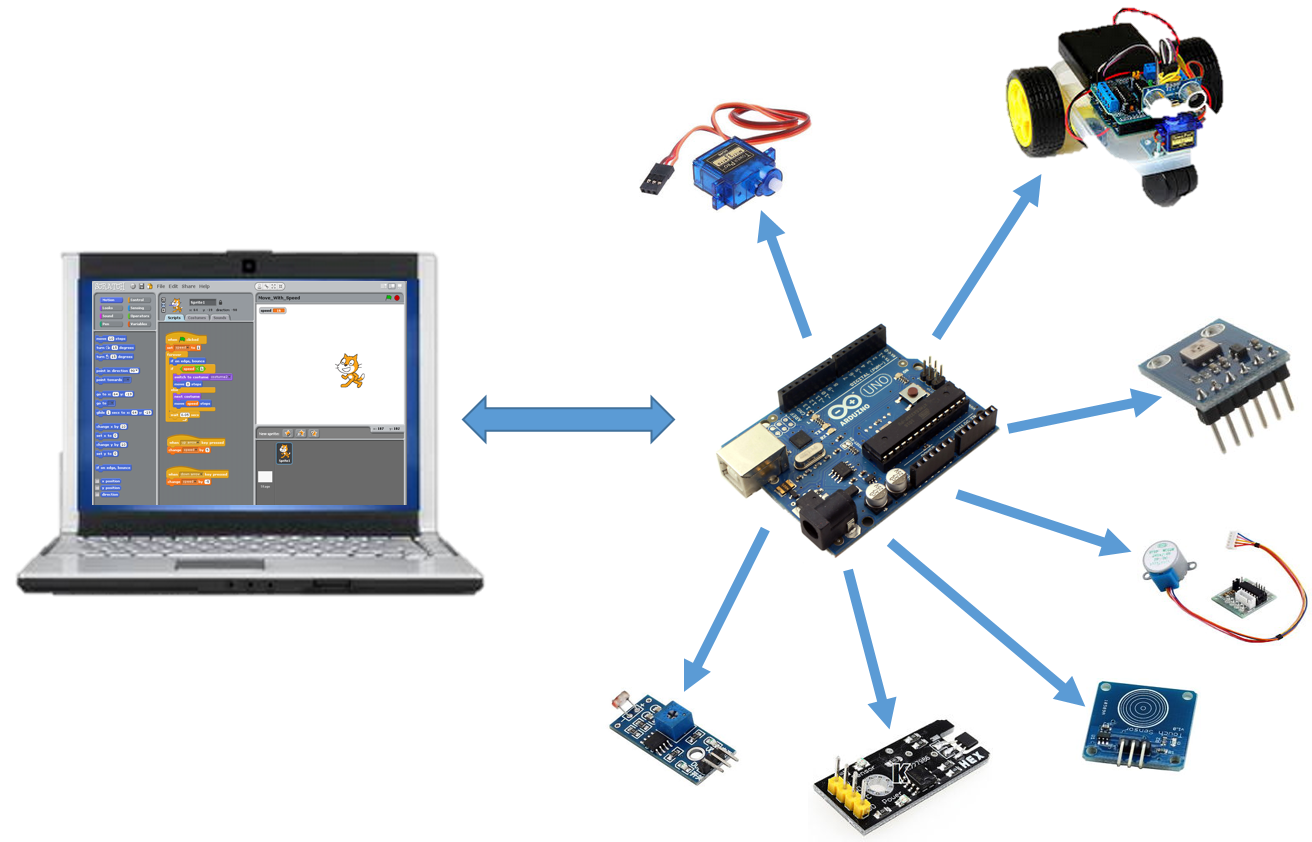
Next development well-worth mentioning created by Citilab from Spain, is
S4A, short for “Scratch for Arduino”. It provides new blocks for managing sensors and
actuators connected to Arduino micro controller.
With its pins mostly assigned to its specific function, it doesn’t
provide any flexibility at all. But hey, what more do you expect ??? It’s free and a good start for beginners. For those who likes to get physical (definitely
NOT with Olivia Newton-John), S4A is
absolutely right up your alley.
Scratch and Arduino practically equates to Physical Computing !!!
More about Scratch coming up soon, where I’ll go through a short
tutorial and some projects from there on.
Happy Scratching.
Subscribe to:
Posts (Atom)